My Cat, She Has No Weekend Plans
My cat, she has no weekend plans
Each day begins as new
It starts whenever she awakes
It ends when she is through
She rises when she hears my sounds
She has but one suggestion
Feed me now, she cries aloud
Supply me my ingestion
Incessantly she pleads her case
As if it needed pleading
The same refrain throughout the day
"I think it's time for feeding"
She's never grateful or annoyed
A flare up quickly settles
She holds no grudge or looks that judge
She bothers not to meddle
The opportunity to be
A cat within the rat race
Would make her yawn, she'd just as soon
Scratch the nearest scratch place
My cat, she has no Facebook page
She hangs with who's around her
She naps or not or wakes or walks
Wherever she has found her
I make my plans for future days
She only makes a meow
Insisting in this moment
That I feed her and be here now
Marion
Truly Fall
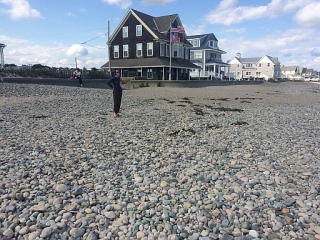
The day is blustery and seasonably crisp. There is a frost warning for Plymouth County tonight. Yesterday brought warmth and a steady offshore breeze for a perfect fall beach walk at Humarock beach.
Normally uneven and rock strewn, the ocean at low tide provided a smooth, wide swath of lightly packed sand like a freshly paved road.
The wind whipped and curled the modest waves which beguiled a couple of surfers.
A bicyclist rode by. We exchanged hellos and nods to other couples. And a few dogs.
Afterwards, we gleaned late season tomatoes from our friends’ garden since they’re traveling in Southeast Asia. It is truly fall.
Joe Wouldn’t Hoe
In my 20’s I shared a house on the east side of Detroit with three other single, semi-employed guys. We became the “The Lakepointe House.”
Ralph Bedard made loud sex, wrote poetry, and crafted flutes by hand from discarded bamboo.
Doug Ferguson (dulcimer) work-studied while finishing a degree at Wayne State University – history? Bob Cameron (guitar) drove a UPS truck as a fill-in driver and tried to keep his VW Beetle running.
I solo’ed as a folk/rock singer, guitarist at bars and coffeehouses across Michigan: Union Street Oyster Bar (Hi, Tom), The Ark (Hi, Rick), … It was the tail end of the 70’s singer-songwriter era.
In The Lakepointe House we jammed a lot. Songs from across the 60’s & 70’s folk blues spectrum, as well as our own creations. Bob penned this favorite and in our diaspora we’ve shared it to all corners of our worlds.
It is many years later and it is August – a perfect time to sing “Joe Wouldn’t Hoe.”
Joe Wouldn't Hoe

By Bob Cameron, c. 1975
Chorus:

Joe wouldn't hoe the ground around his corn

He would stay in bed all the morn

The weeds grew high, up to the sky-eee

But the corn stayed down around his knees.
He got up in the spring to plant his crops

All the while thinking that he'd rather not

This corn he said is just too much work to keep

And with that thought in mind, he promptly went to sleep

(chorus)
[thanks, Doug, for the two next verses]
He went out one bright August day

Hadn't been out there since May

The weeds were wound around the Milky Way-eeee

But the corn was down around his knees
He went to the fair when it came

Farmers there kicked him out in shame

They said "We're not gonna share the blame-eeee

For the corn staying down around your knees"

(chorus)
Folks round there, their thoughts revealed

They thought his corn was an abandoned field

They thought his farm was an auto dumping lot

And when the harvest came, he had a bumper crop... get it?

(chorus)
Now every song has a moral they say

Weed your corn or you won't make hay

Spend some time or you're gonna pay-eeee

When the corn stays down around your knees

(chorus) Janus

In mourning
Our modern age says chaos reigns: entropy, Heisenberg’s uncertainty, Max Planck, quantum mechanics. But our hearts are not mere quanta, empty and full; we yearn for the ancient premise of a perfect universe in perfect harmony.
My friend, Vladimir Barsukov, died suddenly on Tuesday, December 10, 2013. We knew him as a student and teacher of kinetic art, perpetual mobiles. Vladimir said: “I’ve always been fascinated with beautiful and functional objects that rely on basic principles of mechanics and geometry. The movements remind the viewer of the fragility and interconnectedness of life.”
Born in Russia, January 21, 1945, and educated as a mathematician and physicist (Ph.D. Saint Petersburg University, 1967), he was a researcher and teacher at MIT from 1990 – 2005, and maintained a passion for mobile making throughout his life.
Vladimir was an artist, a dreamer, and a restless seeker. His childlike vision delighted in everyday things –
forks, spoons, as well as textures, shapes, colors and materials of all kinds. Infinitely curious and unabashed, he touched every object he encountered at the Marshfield Festival of the Arts with us in May 2011, querying vendors about their designs, finishes and techniques – an alchemist exploring another clue.He thought, he taught, he labored and questioned. He balanced shapes and wires in marvelous symmetry; his mobiles were like living creatures to him, continually moving and changing in space, light and color.
I was among his many students, who marveled at the simple joy he taught of balancing and bringing to life the elements of kinetic sculpture. He shared his talent and taught with wit and a contagious love of knowledge. Vladimir was the universal man. Scientist and spiritualist, cynic and romantic, outsider and world citizen. He worshiped at the alter of insight, harmony and balance – literally juxtaposing opposing forces to create a world in balance.
He trafficked in the music of the spheres and conjured up a universe in harmony — both science and art fully realized. Vladimir once said “Through my work I have discovered what many others have noticed: that precise science and art both reflect nature in a beautiful and elegant way.” Amen, brother.
Sarabande
 In my winter garden, Vladimir’s “Sarabande” still celebrates his presence. In motion.
Here he and his wife, Ann Dix, install Sarabande in my garden, October, 2010.
Ryan Flynn visits our house frequently with our granddaughter, Maisy, whom Vladimir adored. Ryan offered this:
May he make heaven a little cooler with his sculptures.
Besides our sadness, our thoughts are with Ann, who has lost an irreplaceable partner. I am grateful to her for sharing her saddest of news. It was an honor to be Vladimir’s friend.
Kensington Stone Braithwaite
Forward-facing Janus celebrates our new grandson, Kensington Stone Braithwaite, born October 3, 2013 to Kristin Stone Braithwaite and Kenyatta Braithwaite. He arrived at 1:19am weighing 8 pounds, 2 ounces, at 20.5 inches tall with a very full head of hair, kind of Valentino style.
He was dressed for the new year in typical Braithwaite style. We are thrilled with our newest family member.
The Tupelo Speaks
Once we asked a well-regarded landscape architect, Roger Washburn, to consult. It turns out we could not afford him but he was generous with his time and ideas. Among other things, he noted our stand of tupelo trees. My tree knowledge is limited so it was noteworthy to me that they were noteworthy to him.
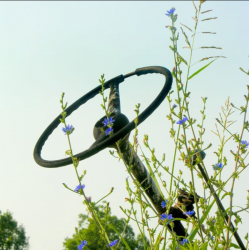
Our tupelos stand behind the weathering Tin Man; they anchor the hanging garden mirror and, here’s the part I’m getting to — they announce the peak of summer.
The tupelos are the first to turn color and drop a leaf and they typically do so in early July, which makes sense from a plant perspective, being on the waning side of summer solstice. This year’s tupelo turn came two weeks late. What now?
Summer Harvest

Hydrangea, phlox, and echinacea with “Minuet”

Hydrangea, black-eyed susan, phlox, monarda
Our summer’s peak saw a blistering heatwave that started early and ended late. Still, the flowers were heavenly. For example, the hydrangea by the back door trellis had hundreds of blue heads, the kousa dogwood is still in bloom, the monarda and phlox are swarming with bees, hummingbirds and butterflies. The swimming pool has been our respite.
More recently degrees have ranged from low 60’s F to mid 80’s F. And rain.
When it was just too hot outside, we enjoyed the blooming harvest inside. This garden is my joy.
Making Cheese at Home
Blessed are the Cheesemakers
Life of Brian
Harry Poulter’s domain ranges beyond the garden and into the kitchen. He recently applied his skills at grain fermentation to another homemade specialty – Cheese making. Think of his story as “Rake and Palate…”
If you can cook, you can start making cheese at home. If you have ever brewed beer, you are halfway there. The simplest cheeses (fresh, spreadable) can be made in a day, with ingredients as common as milk and lemon juice. The most complex cheeses may require heavy presses and months or years of aging.
In addition to what you might think of as cheese, you can easily make cultured butter, yogurt, kefir, paneer, crème fraiche, mascarpone, cream cheese and many more cultured dairy products. I guarantee the fresh homemade varieties will delight you. Guests enjoy knowing you made the cheese you are serving. And savoring your own home-baked bread with your own homemade cheese or butter is an irreplaceable treat for the senses.
I got started when an old friend told me his precocious 11-year old stepdaughter was making cheese. That was a challenge I couldn’t ignore. I thought “Why am I not making my own cheese?” I had been making my own yogurt for years. A short time later, I had acquired the tools and knowledge and had the process down for making some basic and semi-advanced cheeses.
Interested? I’ll show you how to get started.
Cheese, Glorious Cheese
The origins of cheese making are lost in the mists of time, but the process was well established by the time of the ancient Romans and was described by writers of the period. Cheese making probably developed by a series of serendipitous discoveries, which led to a process by which the protein and fat of milk could be separated, solidified and preserved. Rennet and milk-digesting bacteria help acidify the cheese, and, with the addition of salt and other beneficial microbes and molds, inhibit the development of harmful or decay-producing microbes. The breakdown of proteins also leads to the development of wonderful flavors. Local milk varieties, native micro-flora and –fauna and special conditions (like caves) led to regional specialties. The ancient Romans especially esteemed cheeses from what is now France (for much more, see “On Food and Cooking – The Science and Lore of The Kitchen” by Harold McGee).
Information on Cheese Making
Get some good books on the subject. I find it is best, especially for the more complex cheeses, to compare several recipes and see what they have in common and how they differ. I keep a record (my “cheese log”) of each batch to record any notable successes or attempts that could be improved. The book I use most frequently is “Artisan Cheese Making at Home” by Mary Karlin. It’s a good reference and cookbook, though there are some math errors in some recipes (again, compare several sources). Second favorite is “200 Easy Homemade Cheese Recipes” by Debra Amrein-Boyes. I also use Ricki Carroll’s “Home Cheese Making”. There are also numerous online sources, YouTube videos, etc. The most useful online site is probably www.cheeseforum.org . Cheese making suppliers’ websites (see Supplies) also have recipes and tips.
Equipment and Supplies
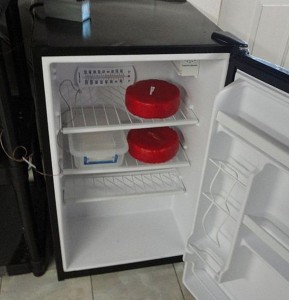
If you are a cook, you probably have the equipment you need to make the simplest cheeses. For the more ambitious cheeses, you will need a few specialized items – molds for forming cheeses, a special ladle and curd knife, butter muslin (a fine-weave version of cheesecloth), draining containers, etc. My biggest investment so far has been a “cheese cave” which provides a controlled environment at about 50 degrees Fahrenheit. I use a “dorm-style” refrigerator, with no freezer compartment, that is plugged into a thermostatically switched outlet. The switch has a long wire probe that is run into the refrigerator to monitor the temperature. Amazon sells a good switch for about $50 (Johnson Controls A19AAT-2C). The best sources I have found for equipment, supplies and specialized ingredients are www.thecheesemaker.com and www.cheesemaking.com
Ingredients
First – the freshest dairy products you can find. A local dairy is your best choice. Try a farmer’s market, or Whole Foods. We have a smallish dairy in nearby Roanoke, VA that sells good quality milk and cream, including non-homogenized (cream on top) milk, which makes a superior cheese. For recipes requiring cream or half-and-half, look for brands which have no additives and are not ultra-pasteurized.
Mold cultures/bacteria cultures/rennets – These specialty ingredients require an initial investment, but they keep a long time. Store cultures in the freezer, rennet in the ‘fridge. Animal rennet is made from the stomach of calves, so some people avoid it. I find that vegetarian rennet is suitable for all but some long-aged cheeses. Commercial cheese manufacturers have started to use rennet produced by modified bacteria, but as far as I know this is not yet available to the home cheese maker.
Let’s make cheese!
1. Dead simple cheese (lemon cheese)
Ingredients
¼ – ½ cup fresh lemon juice (2 or three lemons)
½ tsp. salt – kosher salt works well
Optional herbs and/or garlic
Procedure
Heat the milk slowly, stirring frequently, to about 175 degrees F. Remove from heat and stir in ¼ cup lemon juice. Wait 15 minutes and see if you have a distinct separation of curds and clear whey. If the whey is still cloudy, stir in another tbsp. of lemon juice and wait another 15 minutes. Repeat until you have a clear separation.
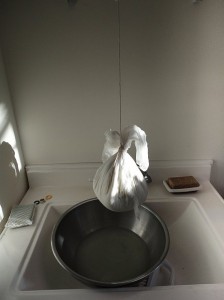
Line a colander with several layers of cheesecloth (or use butter muslin if you have it). Dampen the cloth and dump the contents of the pot into it. Set the colander over a bowl if you want to save the whey (for bread making). You can either leave it to drain as is, or gather up the cloth into a bag and hang it. After an hour or two, it should have a good firm texture.
Put the curds in a bowl and stir in the salt. You can also add a mixture of herbs (Herbes de Provence is good), chives, garlic, etc. to taste. Refrigerate to firm up the cheese and blend the flavors. This cheese will keep well for about a week.
2. Camembert – A good beginner’s “real” cheese.
I won’t give every detail of the recipe here, since it is widely available, and you should have at least one good cookbook before you get this far, but I will illustrate the process.
Sanitation
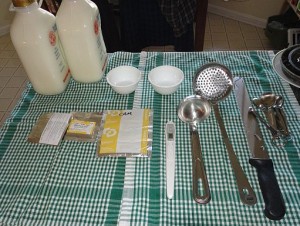
Thermometer, ladles, curd knife, measuring spoons, etc. All sterilized and laid out on a clean cloth. The foil packs hold the bacterial and mold cultures.
Since this cheese needs to age for a while, we need to be more careful about sanitation than with our quickie lemon cheese. We don’t want bad bugs or molds to get a foothold. The first step is to sterilize all cooking vessels and equipment that will contact the milk and cheese. A weak bleach solution (1 tsp/gallon of water) is sufficient. Brewer’s B-Brite or similar oxidizing cleaners will also work.
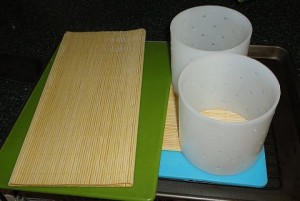
The perforated PVC sections are open-bottomed molds, or “hoops”, for forming the Camembert. The bamboo mats are sushi mats. Also a rimmed baking sheet and two plastic cutting boards. All have been sterilized.
Procedure
Heat the milk, slowly, in a heavy-bottomed (sterilized) pot to 85 degrees F. Then sprinkle on the starter culture (bacteria), and the cheese molds which will form the white rind of the Camembert. After letting the cultures hydrate on the surface for a few minutes, stir them in and hold the temperature for 90 minutes. Most cookbooks advise you to use some kind of double boiler or stove-top water bath to maintain heat. I just fill the kitchen sink with water at the target temperature.
After the curds have achieved a “clean break” from the whey, we slice the curds into chunks. They will not be neat cubes, but a cottage cheese-y mess. The whey should be clear, though.
After cutting, the curds are stirred, then allowed to rest to consolidate and further separate from the whey.
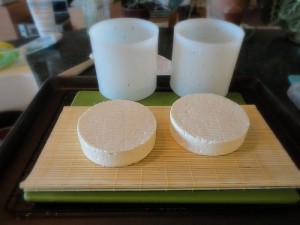
Once the curds are consolidated, we spoon them into the two hoops, which are set upon a sushi mat, which is on a cutting board inside the baking pan.
Then, another sushi mat and cutting board are placed on top. Periodically, we need to pick up the whole assembly and flip it so the alternate cutting board is on the bottom. This is a little tricky. We may also need to drain the bottom pan.
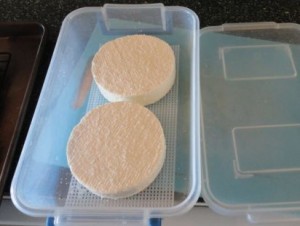
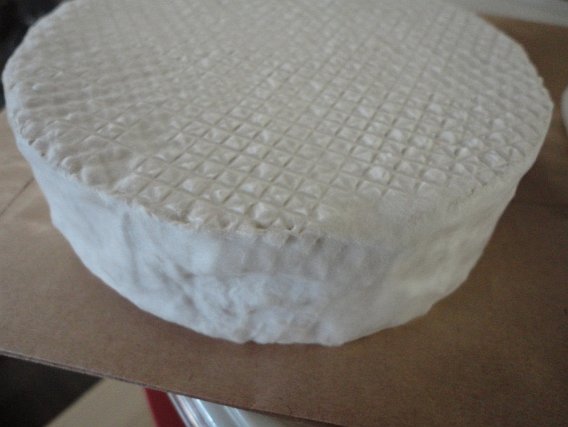
After repeated flipping and an overnight rest, the cheeses are consolidated into their final form. They have picked up a nice pattern from the sushi mats. At this point, they are rubbed with salt to inhibit “bad” mold formation and moved to a draining container.
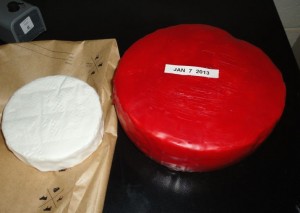
My cheese “cave” is a refrigerator I modified to maintain 50 degrees. The red cheeses in the photo are Jarlsberg (I hope. I won’t know for a couple of months how they turned out).
The Camembert rounds stay in the draining container for about 2 weeks. After that, they are moved to cheese bags or plastic wrap, still in the “cave”, for about another 2 weeks, until the centers are soft. Then they can be moved to regular refrigeration and the aging process stops. You don’t want to over-age a Camembert, because it will start to break down and get a little stinky. Still safe and edible but not as tasty.
Finally…
Almost finished Camembert covered with fine white mold.
Happy cheese making!
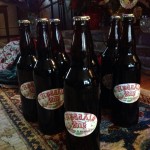
WaddAle 2012 – Marshfield Homebrew
This year, after a long hiatus, I was inspired to brew a batch of “WaddAle,” my nearly eponymous homebrew that I last concocted in 2006. The topic came up while we stood in Small Bar, a hole-in-the-wall beer joint in San Juan, Puerto Rico. Why not? Thus, the plan for WaddAle 2012 was born. Here’s how it worked.
Assemble ingredients
I needed a beer kit. I’m not an adventurous ale maker, I use a kit of pre-selected, pre-measured ingredients. Then, I typically introduce a personal variation. On an errand I accidentally discovered The Homebrew Emporium, a new to me beer supply outlet in Weymouth, MA, managed, it turns out, by an old thespian friend, Jim Bowser. I took that as a good omen.
Nut Brown Ale beer brewing kit from Beer Emporium
I selected their Nut Brown Ale kit (~$32). I’ve also used the True Brew brand kits from Pioppi’s Package store in Plymouth, MA. These beer making kits contain all the ingredients plus brewing instructions, but you need your own equipment – brew pot, fermentation tank, tubing, valves, bottles, caps, capper, etc. Fortunately, the Homebrew Emporium has all that stuff. I had my equipment on hand from my old True Brew Maestro kit.
Next to godliness
The beer gods require cleanliness – the magic of fermentation creates alcohol and fizz but the nutrient rich brewing medium (aka wort) can just as easily nourish invading microbes who will spoil your batch and doom your brew. I avoided that calamity by taking seriously the cleanliness principle. So, first step is always cleaning and sanitizing the equipment with a special cleansing solution (I used B-Brite). I also bought new glass bottles, instead of reusing old ones. For my style of occasional brewing, saving money comes second to simplifying the process. I’ve since learned of a product called PBW (Powdered Brewers Wash) that’s said to positively eliminate any organic residue – so thriftier folks should look into that.
Stinking up the house
If you relate well to the pervasive, hoppy/yeasty smell of a brewpub, you’ll like the next part — brewing the wort. In my case, I announced my brewing plans in advance and waited til I had the house to myself for half a day to spare the sensitive noses.
cooking the wort
Combining ingredients per the given instructions, you end up with a bubbling, gurgling, sometimes overflowing pot of deep brown liquid that cooks for about an hour. Toward the end of this process, I added 4 oz. organic chocolate and
slivered orange peel for seasonal effect, having sanitized the orange peel in advance.
The brewing step ends with transferring the hot wort to the fermenting tank, adding water to make 5 gallons and waiting for it to cool to the right temperature (~78° F.) to allow brewers yeast to kick in. Too hot destroys the yeast critters. I underestimated the cool down time — it took hours and hours (Note to self – start with really cold water in the fermentation tank next time).
Airlock releases carbon dioxide
Finally, I sprinkled and lightly stirred in the brewers yeast, snapped on the lid, fitted the airlock and lugged the tank into the back room. Next morning the fermentation bubbles were manically rattling the airlock. Yes!
Bottling the batch
Waiting for fermentation to complete took about 10 days. Bottling began with — you guessed it: sanitizing. Here’s where having brand new, long neck bottles helps. To further reduce the cleaning and bottling effort, I used 24 oz. bottles, instead of 12 oz. ones. I cleaned and sanitized the bottles, bottle filler, filling tank and tubing in the downstairs bathtub using B-Brite again. Dissolving the priming sugar in boiling water, adding it to the filling tank and siphoning the fermented wort into it readies the filling process. Then, I simply attached the tube to the spigot and let ‘er rip. Capping is fun and makes it feel like a real bottling operation.
Sharing the bounty
As Christmas week approached I retrieved bottled WaddAle from the basement fermentation zone, labeled each with my 2012 WaddAle label (Avery 22829), and packaged shipments for points west, north and south with instructions for awaiting complete bottle conditioning (another week or so). So, if you’re a WaddAle recipient — today’s the day! Open and salute the end of 2012 and the beginning the new year! If you feel left out, well… get busy and brew!
My Sister’s New Garden
My sister’s new garden is nestled within hilly SW Portland. It is compact and lush. I didn’t realize you could harbor such variety and fullness in a small space. Chalk it up to my sister’s sense of order and tidiness.
Meandering nasturtiums splay over the edge of the patio. They thrive on the concrete’s radiant heat.
A curvy flagstone path wends into the back corner, as if there were more to see just around the bend. Crocosmia has nearly finished blushing scarlet; a few sunflowers reach skyward (why aren’t the centers going black, she wants to know).
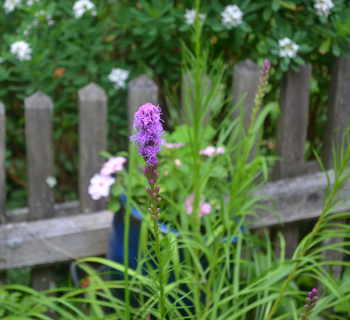
In their midst stand gayfeather (liatris spicata) and a staked tomato!
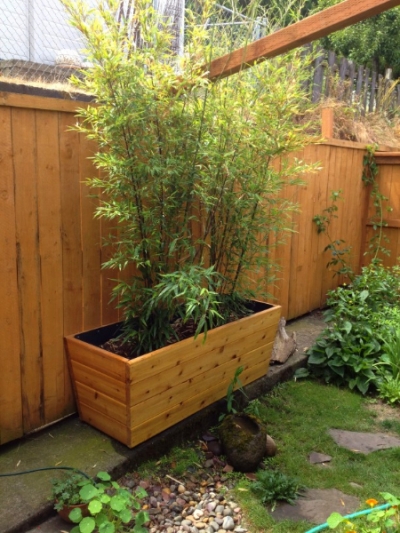
The piece de resistance anchors the back wall – two significant clumps of bamboo confined to an elegant wood planter she purchased up the coast. It is both an appreciation of things past and a recognition of bamboo’s beauty constrained by reality: you don’t want these aggressive grasses overrunning your main garden.
My sister tends her new garden with care and delight. Whimsey and prudence. Premeditation and pluck.
The first thing she installed was the incandescent string of lights vining the translucent, shed-like roof over the sitting area, which is the perfect place for enjoying the flora while reading, writing, sipping – or, finding a brother savoring Sauvie Island Blueberries with Barbados Cream. Heaven.
Three cheers for the red, white and blue!
The perennial garden is at another peak – this time with summer blooms of hydrangea, evening primrose (), bee balm (monarda), cone flower (Echinacea), lady’s mantle (Alchemilla mollis) and day lilies too various to mention (see this article). Plus continually blooming roses, emerging liatris spicata (Gayfeather) and surprise reappearance of sweet smelling daphne. And, of course, classic annuals. Everything seems early this year.
Spring blooms of Japanese dwarf spirea, clematis, astilbe and peonies have faded. The honeysuckle over the trellis is not very happy this year – thinner and fewer blooms, some blackened. I’m trusting this rugged perennial will recoup next year.
I’m a gardener on vacation – which is a special opportunity to reconnect with dirt, buds and beauty. And weeds. I used my push-pull loop hoe along the driveway bed (80 feet) to clear several years’ of embedded weeds. This is an awesome hoe that makes weeding, if not fun, at least productive.
This year’s hydrangeas look so, so blue. Roses in the Betty Garden spill profusely over the stone wall. Family and friends gathered for our almost annual July 3rd party, celebrating summer and fireworks on Humarock Beach. Scituate police enforced a bonfire ban this year but mobs of people and fireworks attended the traditional fest nevertheless.
Our house is literally abuzz outside with painting preparation. We recently reshingled and re-roofed, the next step will conclude a major exterior renovation long in the works. The carpenter who was prepping the trim discovered (how fitting) carpenter ants on the back wing of the house. Bummer. We’re waiting for the exterminator.
End of vacation – tomorrow we’ll see Cirque du Soleil (“Totem”) perform at Boston Marine Terminal.


